
Improving The Area You Ride – Making An Arena
Well, it is official, I have committed to building a new riding arena. Let me rephrase that, I have committed to building a REAL riding arena. And I thought I would share with you what I am doing, how I am doing it, and how much it is going to cost me to do it. So get ready for this, I am going to show you how to improve the area you ride your horse in, one step at a time!
I would consider this the “during” phase. My original planning phase was the before, which I wrote about here.
But now I am committed. I just spent $1,473.00 on supplies to build my arena. I still have to rent the post hole digger, and that will cost around $150.00. So all in, I am planning on this arena build to cost me around $1800.00. This will cover the cost of the following:
- Vinyl fence posts
- Vinyl rails
- Wood for 2 6’ long gates
- Hardware
- Post hole digger rental
- Footing stabilizer – Dust control
This is a little bit less than I had originally planned, which is a good thing! I guess I should include the cost of the new tractor my husband just bought too, but since that is his toy, and I just get to use it, I won’t include that cost.
Moving Egypt
This is how my husband refers to moving the sand that was in my original riding area. He spent the better part of two days moving the sand around to fill the new riding arena.

So far so good. He did a fantastic job of moving the sand. And I am very happy that the original 65 tons of sand is plenty (for now) to give a nice footing to my new riding arena.

And since he did the hard work of redistributing the sand, now it’s my job to drive and drag the sand. This isn’t difficult, especially with the new tractor. In fact, once I got used to the size of the tractor, and he removed the bucket (Thanks Dale) I was happily tooling around the arena. I have no idea of what was going through my head, but I was probably thinking about how I am going to set up my first official jump course.

And although it is really dusty right now, I did have to take both horses out and work them for a bit in the freshly created riding arena. The footing feels good, and I think it will be perfect for what I want to use it for. The sheer size of the arena is about double what I had originally had. And the sand that I had was enough to be spread through the entire area.
De-Dusting The Dirt
The footing stabilizer should be here next week, so I can work on that once it gets here. And I promise to give a full report of how it works. I was sad to see that when I was doing my research for dust cutters, or how to get the dust out of the riding arena on Google, I could not find any reviews of thee products. So hopefully my review will be helpful to those of you, like me, that are wondering if this product is worth the cost.
I found two different products that seem to do the same thing. One is called Whoa-Dust, and one is called Moisture Lok Dust Control. I was really planning on going with Whoa-Dust first, but it would cost me $800.00 for 17.7 lbs of the product. This is still less expensive than adding shredded rubber. But then I found the Moisture Lok at Ramm Horse Fencing & Stalls. It costs $335.00 for 50 lbs. And it looks to be very similar to the Whoa Dust. But at about 50% less expensive, I decided to go with the Moisture Lok.

Both products have the same instructions for the application, but we will see once the Moisture Lok gets here. You apply it with a hand-held seed/fertilizer spreader, then get everything really wet, and then re-groom the ground. Maybe I will do a before and after video to see how good it really works.
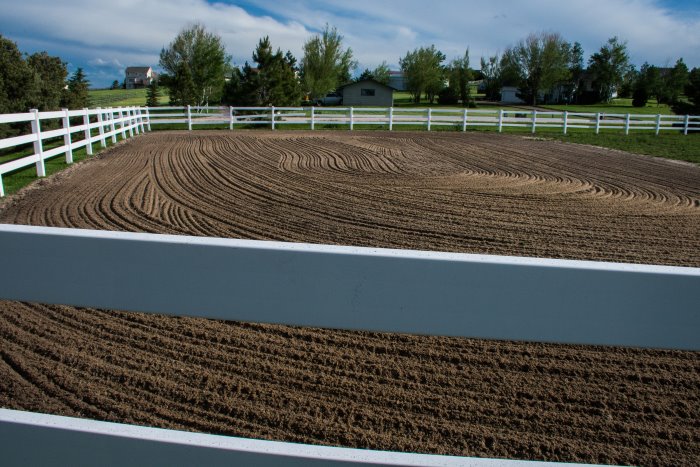
The Current State Of The Arena
So this is all I am able to do for now. I have ordered the fencing, and the dust control stuff, and I have called 811 to have the utilities flagged out, so we don’t inadvertently dig a post hole through our gas or electrical lines. But until the stuff gets here, and I have pretty flags in the ground I am in a holding pattern.

But even though the arena is not finished, I can still ride in my “official riding area” and dream of the day when it is completely finished. I cannot wait! Be sure to check back for the progress of the arena, and my thoughts on the Moisture Lok. I hope it is everything I want it to be, so I can be riding my horses in a fenced, and dust free arena that is my own!
2 replies to "How To Improve The Area You Ride – Making An Arena"
I am very excited to have found your blog!!! I need help. We are taking the plunge and buying a home with 5 Acres. It does not have an outdoor arena. We have a spot that is fairly flat with grass. How did you start making your footing?
Hi Kim 🙂
Congratulations on finding a property! That is so exciting! When I started with making my own riding arena, I didn’t have anything more than a part of the horse pasture. First I bought an arena drag that I cold hook up to our riding lawn mower (we didn’t have a tractor then either) and I just started using the drag over and over again in the area. And after a few years, I finally had sand brought in. That was the best thing I could have done. Having the sand made it really ‘feel’ like a real arena. It also helped to kill the rest of the grass that had been growing.
This past year was when we decided to make a true arena, and expand what we already had. My husband moved the sand that we already had, and then we put up the fence line to be able to enclose the area. And the sand that we had was not enough to cover the larger area, but I made due with what I had for last year. This year, hopefully in a couple of months we will be getting another load of sand brought in. And I call it sand, but it is really an arena mix. I am lucky there is a sand and gravel place literally 2 miles away.
So if it is possible for you to get a load of sand (arena mix), that will really make your area feel like a real riding arena. The sand also helps with your riding, and keeping the ground pretty consistent regardless of the weather. If you have a tractor with a bucket it will make it easier to spread the sand. Or you can rent a little loader, like a bobcat to spread the sand around.
Good luck with your property, I hope it is everything you have dreamed of! 🙂
~Lisa