
DIY Shedding Tool
Every year we as horse enthusiasts become excited when we start brushing our horses, and we begin to see little hairs that are releasing themselves from their coats. Just when we think the winter will never be over, and the glorious days of summer are too far off to even dream about, something magical happens. Our horses begin to shed! And the tools are getting better and better to help with this, but I am going to show you how you can DIY an incredible shedding tool for about $0.83!
It is a bittersweet happiness for me, because it gives me hope that the summer will soon return, and I picture myself outside for hours with my horses. But when they get fully into shedding mode and I am spitting horse hair out of my mouth, I am wishing for the shedding to be done in a hurry!
In the past I have used the typical shedding that you can buy for around $6.00. But it can be cumbersome to use, and honestly I just don’t like it. Then I found some new types of shedding tools you can buy online. And yes, they are really nice, but they are expensive. The Groom Ninja is $24.00 for the horse size one. And there is the Sleek EZ for $20.00, but I am not crazy about the design of them, so I decided to make my own.
And the best part about making my own shedding blocks (as I like to call them) is how inexpensive they are! I was able to make several different sized blocks for about $0.83. And I got a little creative, and wanted them to be pretty, so I painted them. There is just something happy about brightly colored brushes and grooming equipment!

The Ingredients
- 1” x 1” x 8’ lumber (I used pine)
- 10” hack saw blade (I used 24 teeth per inch blades for mine)
- Wood glue, or any craft adhesive
- Mod Podge Sealer
- Acrylic paints (optional)
- sandpaper
- Tools You Will need:
- Hand Saw
- Skill saw
- Wood clamp
- Tin Snips
- Orbital sander
The Recipe
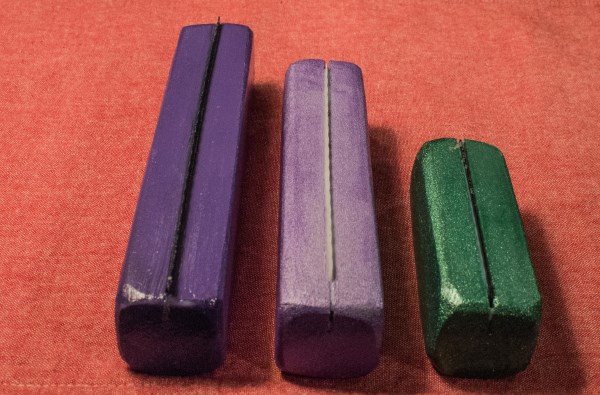
First you will need to cut the hack saw blade to the approximate size you want it to be. I wanted mine to be about 6” long, so I would be able to cover a wide section of my horse, but not too big where I could lose control over the blade. So about 7” was perfect for me.

After you have cut your blade, now you will cut the 1”x 1” lumber to the size you want it to be. For my shedding block, I wanted to there to be a gap of about 1” on either side of my blade, so I measured my block to be about 8” long. This works perfect for me to hold in my hand, cover a lot of my horse in one swoop, and still be easy enough to handle. I prefer the 1” x 1” lumber because it fits easy in your hand. But you can use whatever wood you would like, I just found this was perfect for my needs.

After you have cut the 1” lumber to the size you want it to be, now you will sand it smooth. All sides, and every part of the wood should be smooth. To make it even easier to hold once completed, round all of the edges. This makes it really nice to work with.

Now that your wood is nice and smooth, you will need to cut the groove where you will be placing the hack saw blade.
You want to have the blade be in the middle of the block of wood.

Secure the wood block to a surface so you can use your saw to cut into the wood. BE VERY CAREFUL WHEN USING THE SAW! You do not want to cut yourself while you are sawing the groove for your hacksaw blade!!!
Once the wood is secured, then taking your hand saw (even a hacksaw to begin) and slowly begin to work on the groove. It will take a little bit of patience, and a lot of slow sawing, but it will work, I promise!

When you have a pretty good groove, insert the hacksaw blade to see how much it is coming out. You want the blade to be about ¼” outside of the block of wood. You can have it out a little bit more if you like. I chose to keep mine barely out, so I will not get too aggressive while I am using it!
Once your groove has been cut, and you are happy with the depth of the blade, remove the excess saw dust from your sanding. You could even go over it with your sander one more time.
Now that you are done sanding, you can paint or stain the block. I like to paint the block before inserting the blade, because then I don’t have to be careful about getting paint onto the blade. So go ahead and paint, or stain your wood block, or leave it plain if that is what you want to do.

After your paint has dried, take your blade, and on the smooth part, this is the side you will be inserting into the block of wood. You will want the serrated blade part to be exposed. SO on both sides of the saw blade, close to the smooth side put adhesive all along both sides. I used a construction adhesive which works great, and dries pretty fast. When it is dry it also dries clear, added bonus!

Insert the glue sides into the groove. You will probably end up with excess glue coming out, this is ok. You just wipe off the excess glue, and it should seal the edges between the wood and the blade. After you have wiped off the excess glue, allow to dry for at least 24 hours.
I will warn you it is really hard to stop at this point, because you are so close to being done! But just think of the waiting time as an important step, and don’t skimp!
To finish off your horse shedding tool, you will want to seal all sides of the wood with mod podge. Mod-podge comes in different sheen’s, like matte, satin and high gloss. I like the high gloss in this instance because the hair and dirt that accumulate can be wiped right off.
After you have put on several coats of mod-podge, allow to dry 24 hours, and then your shedding block will be ready for use!
I have made several of these shedding blocks, mainly because they are simple to make, and it is nice to have several different sizes to use on my horses. They also make a really thoughtful and unique gift for your horse loving friends, or would make a fantastic prize at a horse show, or riding club auction. And each time, they looked better, and better!
So if this is your first attempt at a horse craft, and you aren’t quite satisfied with your results, keep working at it. You will get better, and your end results will be incredible. And if you are a visual learner, I made a video of the entire process on my YouTube channel, The Budget Equestrian. Where so far I have 140 videos all related to horses, I am sure you will find something you can make!
7 replies to "How To DIY A Shedding Tool For Your Horse"
Hi Lisa, You are a great DIYer. I had used shedding tool but never know details that you share. Just Thanks
I’m going to try this on my cat they sell same one for cats dogs and horses ..on sleekez
It is critical for you to pick the correct device for pony prepping as steeds have delicate skin and may respond antagonistically to a specific preparing apparatus.
Hi Kathy,
I agree with you 100%. And the DIY tool I made is actually really gentle, the teeth are not near as harsh as they appear (or sound). I have used it on my very thin skinned Thoroughbred with no problems. But of course, common sense needs to prevail, and when you are using any type of shedding tool on your horse, be mindful of how vigorous you get with the tool.
~Lisa
I like your ideas it’s amazing and I used these ideas to make a shaving horse and its working.
I’m huge fan of DIY working. Your idea is so amazing and I like your idea very much.
Thanks for your valuable tips.
Am teaching my kids how to be self reliant and organized. The ideas you shared very valid, we will try them over the weekend.