
I was scrolling through the internet the other day, and I found a post of a summer home tour from Designing Vibes. And this blog was a part of 30 blogs that gave a glimpse into their lives, and homes by posting summer home tours and it inspired me. It inspired me to do my own version of a summer home tour – equestrian style.

It also inspired me to get creative in my home, and gave me a lot of project ideas.
So I got busy, real busy, in getting these projects off of my someday list, and turned them into today projects to get done. Then I could take you on a tour of our home!
Exterior Home Painting
One of the first things I wanted to get done during my vacation was to get the exterior painting of our house done. I honestly thought we would be able to do this in 3 days. Well, I was wrong. this was a major DIY project.
It took us about 10 days or so for the house, and then another week for the back porch. But now that it’s done, it was so worth the work it involved.

I had bought the paint a while back when Home Depot had a sale on their paint. I’m still waiting for the rebate in the mail.
So I guess I was able to get this project done in a relatively short period of time.

I found a paint sample of a Benjamin Moore paint that I really liked, and I had the guy at Home Depot color match it. I am very happy with how it turned out.
No more baby puke green as my husband called it.

And while we have always had a front porch swing, we don’t ever use it. So we decided to not hang it back up.

I like the front porch without the swing. It makes it bigger, and more open. We don’t have a lot of extras. No staging, or adding things to make it looks fancy. It is what it is, and it works for us just fine.
Unintended Extra Projects
We also had a project that I did not intend on having happen, a new hot tub, which lead to a back deck update.
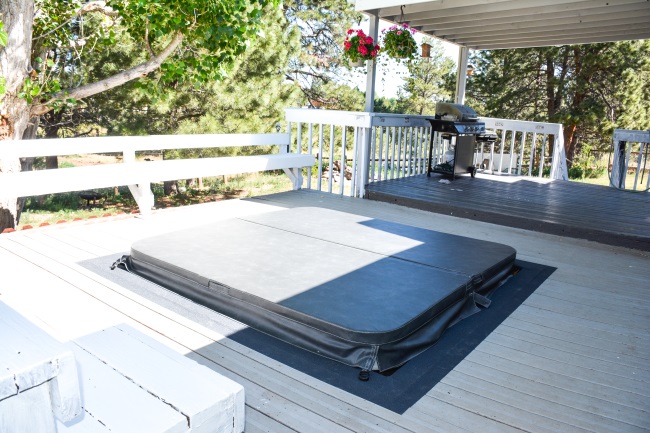
Which led to a lot more painting that I hadn’t really planned on doing, but it turned out really nice. I had the time, so why not?
And to add a little pop of color, I caved in and bought a few hanging baskets of one of my favorite colors, bright pink!

Barn Makeover

The barn was one of the first projects I made over with a new paint job from Rustoleum oil based paint in Smoke Gray for the body, and high gloss white for the trim.

I also updated my hitching post with a fresh coat of white paint.
And to perfect my new barn, my husband helped me to re-do the paddocks for my boys.
This was definitely a project worth doing. We replaced all of the landscaping timber posts with ‘real’ 4 x 6 posts and used metal straps to attach the panels. No more twine for connecting the panels to the posts!

I also bought some stronger gates. These are bull gates. They are very strong, and can withstand a 1200 lb pushy beast leaning up against it. I was uber happy were painted gray. This way they match the color scheme of the barn, and the house.
I like to be matchy-matchy. So I had to update their name plaques to be gray and white, so it would match the new colors. I know, I didn’t have to do it, but it was fun.

To complete the barn project, I made the new stall signs for each horse to attach to the front of their paddocks. I waited until I was ‘done-done’, like adding the very final piece of the project to complete it.

And the back pasture was in need of some attention with a couple of trees that had died. There were some weeds that had begun to take over. This was a relatively easy project. I just had to cut down the dead trees, and mow the pasture.

But the end result is what matters.
I also wanted to get rid of the green gates that were original to the pastures, but I didn’t want to invest almost $1000.00 and then have to put in new gates, so I bought a gallon of the Rustoleum Smoke Gray Paint, and painted all of the gates.
Now they aren’t the exact same color as the new paddock gates, but they are close enough. And it only cost me $28.00 to update the gates!
Master Bedroom Makeover

And this was a project that I had not intended on doing. But my husband turned into me for a few days and decided he wanted to re-do our master closet. Well, he wanted to make it so we could actually reach our clothes.
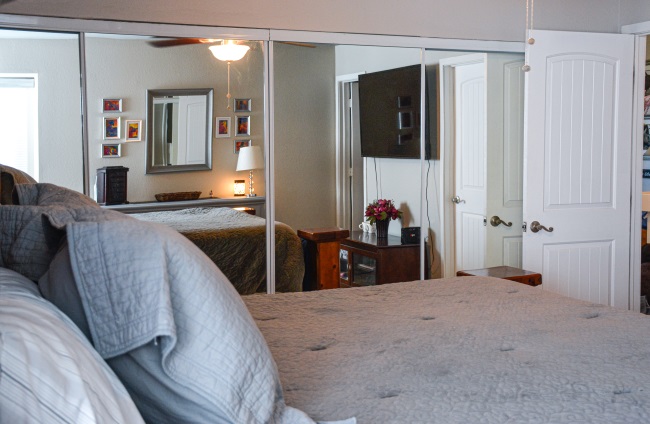
So he bought another set of mirrored closet door and put them in.

But when he put them in, he had to do some patching of the wall we had made. And I could have just bought some more brown paint, but no.

I decided I was tired of the dark brown walls, so I found a gray paint that was pretty and the bedroom walls got a fresh coat of paint.

And not being able to stop myself, I gave my tired and old dresser a makeover with some chalk paint I found on Amazon.
I had wanted to find the Annie Sloan chalk paint, because I had heard that was the best. But it’s also a lot of work, and more expensive than the paint I ended up buying.

Then I went to Amazon, and found all in one chalk paint that is the primer, paint and wax in one product. It’s Heritage chalk paint in cobblestone.
So my old 1990’s dresser got a makeover

Including new drawer pulls
And my husband really hated the mirror we had hanging up, so we found a new one for around $50.00 from Lowes.

And I wanted to add a little color, and I am in love with Laurel Burch. So much that I bought a purse, and found a fabric panel that I repurposed into a bunch of little pieces of art to hang on our walls.

I love the bright colors. And all I did was cut out portions of the fabric and frame it using Dollar Tree frames. You can see how I did it here.

Over the course of a week (or two), I was able to turn our bedroom from a cave into a sanctuary. Like I said, this was not a project I had planned on taking on, but I was happy it was put upon me to do so.
Oh, and I had to add a little something extra to the interior of the closet too.

I found these hooks at the dollar store! I simply attached them to the closet organizers and added some hooks for our belts too.
Easy Dining Room Update
And for the dining room, I didn’t really need to do anything other than clean. But I did make a table runner using Dollar Tree place mats that I put my homemade tray on.

And then I painted some pine cones to make them look like little flowers.

I love the little pops of color in our pretty neutral home.
Painting Furniture
And I still wasn’t done. I had some paint left over from my dresser project, so I updated a side table, and also a sofa table that acts as a catchall when we come in our home.
This Heritage chalk paint is so great.

It covers well, and no brush stokes. I am so so so soooooo impressed with this paint!
Equestrian Summer Home Tour
While this home tour isn’t a complete walk through of our home, it is a glimpse of what it’s like to live as an equestrian.

And just because I don’t live in a suburb, or fancy neighborhood, doesn’t mean I can’t make the most of what I have.
And make little updates for the change of seasons.
Having my horses at home just gives me more opportunities to decorate, And love where I live.
So I hope you enjoyed my little summer home tour, equestrian style.

And maybe it inspired you to go create something fun in your home too! Like these Dollar store DIY projects I made. The photo above is a Pottery Barn inspired mirror that I made to go in our kitchen. It cost me $11.00 to make it.
Or these copper candle sticks, I made these using dollar store glass candle holders. And even the candles are from the dollar store. I love making things like this! Little accents that are easy and affordable, leaves me more money and time for my horses.

Maybe we should start a blog hop of equestrian summer home tours? What do you think?
If you have an equestrian home, or blog I would love to see it, and I bet others would too.
So why note leave a note below with your blog, and your own summer home tour?
I can’t wait to see it!