
Refreshing horse jumps and how to build horse jumps – not very difficult with a few power tools, a lot of sweat, and some paint.

And I have a lot of horse jump components that need to be refreshed. This is what it looks like when you leave your horse jumps out in the elements for years and years. Some of them look ok. Some, not so much. But the good news is, this is easily remedied!
Affiliate Disclaimer: I am an affiliate of Amazon, and I participate in the Amazon Associates Program. Some of the blog posts on my site will allow you to purchase different products and services online provided by other merchants and not myself. Some of the links that I post on my site are “affiliate links.” This means if you click on the link and purchase the item, I may receive an affiliate commission.* I am a participant in the Amazon Services LLC Associates Program, an affiliate advertising program designed to provide a means for me to earn a commission by linking to Amazon.com and affiliated sites. *Disclosed in accordance with the Federal Trade Commission’s 16 CFR, Part 255: “Guides Concerning the Use of Endorsements and Testimonials in Advertising.”
I don’t even know how many horse jumps I have built over the past 10 years. It has been a lot for sure.

And even though I have been out of the jump-building game for a while, doesn’t mean I have forgotten how to do it. And now, with my recently found extra time and trying to earn a little extra money, I have decided to get back into the jump-building game. Or I should say refreshing the jumps that I have in order to sell them.
And I figured I would take the weekend to make the jumps look pretty and be serviceable and maybe earn a few extra $$$. So I started looking at the price of jumps, both singular jumps and sets. You know, just to see what’s out there and how much a jump is going for. And holy moly, just like everything else, the price of horse jumps has skyrocketed!

What the crap? $700 for a single jump? Good gravy sh#$ is expensive! Hmmmm…. I wonder how much a complete set of jumps would cost? I started wondering. So my fingers started typing in “Horse Jumps” to Google, and this is what I found….

I will not be pricing my jumps like that. That is ridiculous. No, mine will be affordable. Not cheap, but affordable for sure. And I started to do the math in my head. If I built a simple jump, a set of standards, 2 rails, and two pair of jump cups – $300.00 -$400.00 seems ok? Right? And I think right now I have 10 pair of standards along with all of the extras to make jumps that would net me about $3000 for my horsey fund. I can work with that. I think.
And in case you are thinking about building your own jumps, I thought you might find this helpful. So let me talk a little bit about the supplies…
How to Build Horse Jumps
First, you will need to find some wood. It can be new wood. It can be used wood. That doesn’t matter. As long as it is serviceable. Meaning useable and can withstand horses knocking into them and being moved around a lot.
Mine have held up pretty well, even with the neglect I have bestowed upon them. The feet, however, well, with being in constant contact with the ground and fluctuating temperatures and wetness, well the feet have seen better days.

But before I remove the feel, I like to see what I am truly dealing with. So I start by using the pressure washer to remove any flaky paint, as well as the dirt.

Focusing on the Feet
Next, I will set the pieces out in my driveway to completely dry before moving on to the next step.
But it’s easy to remove the feet, add some new ones, secure, prime, and paint. I think the priming is the most important step – especially when considering the bottom of the jump. And because I am big on recycling, I find random lumber that I can repurpose to be a part of the jump.

How to Build Horse Jumps
One more word on the feet, 2×4 wood is ok, but 2 x 6 wood is better. The wider the support, the more stable the jump will be. This is one area you don’t want to get cheap on. And the same is true for the length of the feet. The taller the jump standard, the longer the feet should be.

For my 4-foot tall standards, 16 inches is the bare minimum for each of the feet. And for my five-foot standards, I think at least 18″ feet are the best.
This helps with the stability of the jump. The bigger or taller the jump, the bigger the feet should be for stability.
All right, so I have gone off the deep end a little bit and told you how I do what I do. But I wanted to go a little deeper into the supplies that are my staple horse building go to items.
Best of the Best Products for Building Horse Jumps
As I said before, you don’t want to skimp on the building materials for your jumps. If you skimp, your jumps won’t hold up. So spend a little bit extra to get the materials that really work. These are the best of the best, in my opinion.
Rustoleum Oil Based Paint

This is my go-to paint. However, it has gotten pretty expensive locally. So the Rustoleum oil-based paint costs about the same on Amazon. But it works really well. And your paint job will last with this paint. If you are only going to be painting a few jumps, a quart should be enough for the main color. And then, if you want to add some color, you may be able to get away with an 8-ounce container.

I did, however, find this paint on Amazon while I was searching. This is Diamond Brite Paint 1 Gallon Oil Base Enamel Paint in White. And it was about half the cost of my favorite Rustoleum paint. We shall see how it works. If I’m going to be building some jumps, I need good and affordable white paint. I will do a complete review and comparison once I get to try it out.
Liquid Nails Heavy Duty Construction Adhesive

Now this stuff is STRONG. When attaching feet to a jump standard, especially wing standards – you need this stuff. It is super affordable too. But you will also need a caulking gun to be able to use it. I love liquid nails. This makes any project stand up to heavy-duty use.

You can find these on Amazon. And while I have always used Deckmate screws in the past, again, they are getting really expensive. So I found these, and they are a little more affordable. The 3″ screws work great for attaching feet to the upright section of the jump standard. But 2″ screws work best (along with Liquid Nails) for gates.’And so far, so good with using the less expensive version of screws!
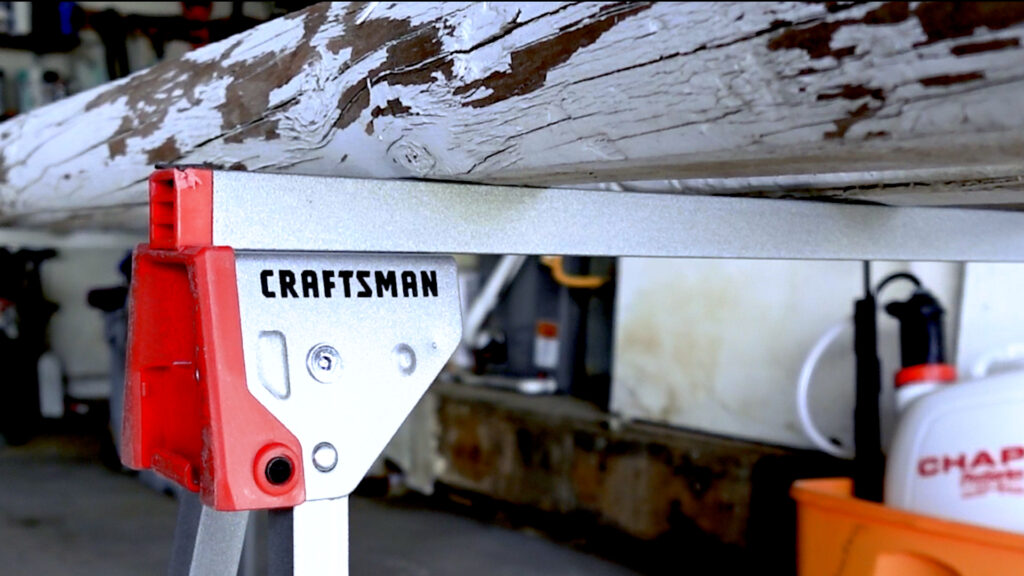
Craftsman Saw Horses
Ok, way back when I built a lot of jumps, I had a few boxes that I had made that worked great for painting and filing rails.

Unfortunately, they took up a lot of room in my garage. So we got rid of them. Fast forward 5 or 6 years, and now I don’t have anything to help make the jump painting process easier. That is until now,…

I found these Craftsman Saw Horses on Amazon for cheap! And the best part is they are foldable. Yay me! So I have a raised surface to paint my jump rails, and they fold up flat for easy and compact storage. They are very sturdy too! I can have 5 rails on these sawhorses, and it’s fine. Now, if I get serious about my jump building again, I may have to invest in a few more pairs of these sawhorses. But for now, 1 set is just fine.
How to Build Horse Jumps
Well, my weekend project, or what I thought was going to be a weekend project, has turned into a two week project so far.
It will be worth it when I am finished for sure. And I am hopeful that I will be able to sell these jumps to someone that will get some use out of them. And this means I will also get a lot of the clutter gone on my own property. I like things to be nice and tidy. It just makes me happy!
I will be posting some different things about building horse jumps for yourself. I think making your own jumps is far better than spending thousands of dollars on buying them. This is probably because I don’t have thousands of dollars available to buy a set of jumps. And I am fairly confident that people who read my blogs don’t either.

But I think the end result will be worth it for sure. Time will tell. So be sure to check back for further tips on how to build your own horse jumps or improve upon the jumps you have already built or bought.

Happy Jump Building!
6 replies to "Refreshing Horse Jumps or Building Them – The Affordable Way"
Wow! These look just like new after the refurbishing! I really like the colors. Back in the day, I built my own jumps too. There were no manufactured ones available then. Hope the horse-hunting is going well!
Thank you Kay!:)
Horse hunting is a bit different than it has been in the past. But that is ok, one day, I will find a horse!
There are so many horse jump makers nowadays = which is good, because then anyone who is building their own jumps has a lot of examples to follow. The jump building process does take time, but it isn’t necessarily difficult. Which is a good thing!
Horse prices in Mississippi where I live are ridiculous too. I’m looking for a large pony/small horse for my granddaughter and I’m not going to pay thousands for a pony that has been bought at auction with no background on health, maintenance, or any other needful information. But even those with a solid background are sometimes ridiculous too. But if we find what we want, I guess we’ll have to fork it out! LOL! BTW, I’m a retired RN with 45 years in that profession. Hope you have a good day. I’ve got to go pastures today. Looking forward to the next videos! Bye!
You’re so good, great job!! and such cost savings! I have only one question, what is the basis for such a jump price?!
Hi Anne 🙂
When I was doing research on horse jumps, I was looking for jumps that I could create, like a simple jump which would include 2 rails, a pair of standards, and 2 pair of jump cups. And if you add color striping to the rails, this seems to increase the price a little bit. But it just depends on where you look. For example, these are a few places I looked when determining jump prices, and how to price mine when I finally get them done to sell:
Amazon standards: https://amzn.to/3MZwdoO (this is for one pair of standards $130, plus shipping)
Amazon jump rails: https://amzn.to/3N3oC8H (this is for 6 painted rails 10 ft long $324, plus shipping
Amazon Jump Cups: https://amzn.to/42w3vla (this is for the cheaper version $12 per pair)
Amazon Jump Cups: https://amzn.to/3P1t5eJ (this is for the better quality jump cups by Dapple Equine $35 a pair)
By buying the pieces needed to build a simple jump this way, it would cost $786 – plus freight shipping for components to build 3 jumps – not too bad really. But then you have to add in the freight shipping. Same goes for these places I visited:
Get Jumps (https://getjumps.com/ )
Old Dominion Jumps: https://www.olddominionjumps.com/prices/
Jumps West: https://www.jumpswest.com/
Dalman Jump Company: https://dalmanjumpco.com/
And of course eBay!
I did find some pretty good deals on eBay for jumps – but most of them you need to live locally to pick them up The most popular and seemingly readily available places to buy jumps through places like Smart Pak, Dover, Etc. Is through Burlingham Jumps or you can visit their site directly at Burlingham Sports: https://www.burlinghamsports.com/
I hope this helps answers your question. And thank you for your question, I think it will actually make a wonderful blog post!
Have a good day 🙂
Lisa
Thanks for the answer! The question is more than settled. Have a good day!