
Day 14 Of The Confident Rider Challenge
We have been working on a lot of groundwork so far in our challenge. And we have been establishing a routine for ourselves and our horses with the daily work we have been doing. And today we are going to be adding something new to our training! Today we are going to introduce ground poles to incorporate into our groundwork.
The Benefit Of Ground Poles
The addition of ground poles to your horses work encourages him (or her) to be more rhythmic while helping him to become more balanced. And it has the added benefit of helping to build strength to his hindquarters. So not only are we helping our horses progress with their quietness, but we are also getting them fit. That is definitely a plus, don’t you think?
If you don’t have ground poles, you can make them yourself very affordably. I wrote an article about building ground poles which might be helpful for you now. And you don’t have to paint them now, but having them will be helpful. I buy mine at Home Depot. They are also known as cherry tone landscaping timbers and they cost about $4.00 per pole. Yes, very affordable. Later on you can paint them if you want too. I like having mine painted to protect them from sitting on the ground, which they almost always do.

And if you don’t have ‘official’ ground poles, but you have jump rails, use the jump rails, because they are the same thing, in my opinion.
How To Use Ground Poles For Groundwork
When adding a new element to your training, it is best to start with the most simple addition. So for ground poles you want to start your horse working over a single pole. When he has perfected that, then you can add more poles. Once your horse is able to navigate 1 pole at a time, at all gaits, then you can add poles and build up to a grid of 4 or 5 poles.

There will need to be spacing between the poles when you set them up. And the sizes will be slightly different for different horses related to the size of your horse, and how large his stride is. But you can use this as a starting point.
- Walk Poles: 2 1/2′ to 3′ apart
- Trot Poles: 4 1/2′ to 5′ apart
- Canter Poles: 9′ to 10′ apart
And your horse’s hooves should be landing in the space in the center between the poles.
First Things First
Before you get your horse out to your arena where you will be using your poles, you need to set the poles up. And this is easier to do when you don’t have a horse following you around to investigate what you are doing.

For example, one one side of my arena I have one pole set up to lunge over. And on the other end of my arena, I have 3 poles set up as trot poles for Ethan. My trot poles are set at about 5 feet apart.
And after I am happy with how my poles are set up, then it’s time to go get my horse.
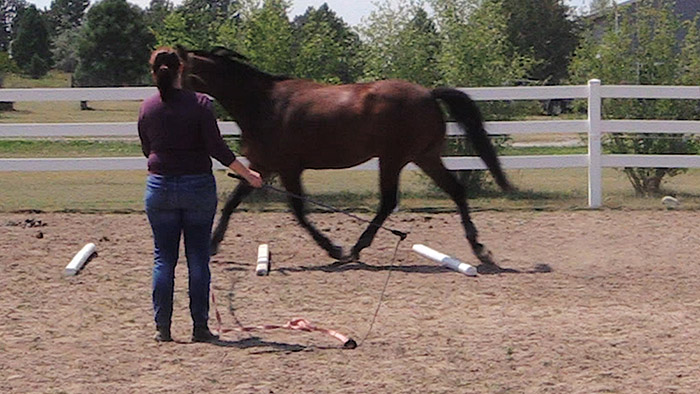
When I am working Ethan over poles, I do like his legs to be protected. I use open front boots and bell boots on the front feet, and ankle boots on his hind feet. I want to do everything I can to keep his legs injury free, and make it safe for him while he is going over the poles. Sometimes in the beginning, horses tend to get a little excited by the ground poles, and they might think the need to launch themselves over it. So it’s better to have their legs protected, just in case.
I also like to use a 30 foot lunge line to work him over the ground poles, along with my stick and string. But if you have a lunge whip, that will work fine too. I am still using my knotted rope halter, and no fancy devices like side reins.
The First Time Over Poles
Now that my horse is ready to go, and I have the arena set up, it’s time to walk him out to the arena. I will walk him, in hand, around the arena so he can check out the poles. Then it’s time to get to work over the single pole.

I start at a walk, and have him go over the pole in both directions. And when he is confidently walking over the pole, I ask for a trot. And once he is good with the trot, I ask for the canter. Again, I do this in both directions over the pole. And I consider it a success when he isn’t hitting the pole with his feet. And once he is successful with the single pole, I take him to the mounting block for a break. Remember, every time he needs to rest, we always rest by the mounting block.

Now if this is your horse’s first time with ground poles, and he has gotten to this point, it might be a good place to end. Or if your horse is ready for more, you can go over to the trot poles. Even though I have my poles distanced for trotting, I do let Ethan walk over and through the poles. Then I lunge him over them in walk, in both directions and then I ask for the trot.
This will not be perfect the first time through the poles. And this is ok, don’t get discouraged. the more you practice the better it will be. So keep at it, and in time your horse will look so beautiful and round going over the poles. Just like everything else we have been working on, your dedication and consistency will make this exercise successful for you and your horse.
Daily Challenge

So can you guess what your challenge will be for the day? You guessed right, ground poles! If you have some poles you can use, set up just one pole and introduce your horse to it. See if you can get him to walk, trot and canter over the pole. And if he does it, great! This would be a fantastic place to stop your horse for the day.
But if your horse is already used to ground poles, set up some trot poles for him. Work him in both directions of your arena over the poles. When he can go over them in both directions without hitting them, this is when you stop. With consistency and repetition, I think you will really enjoy working over ground poles. It’s fun, and your horse will look fantastic as he trots over a set of poles!
2 replies to "Introducing Ground Poles To Your Groundwork"
your ground training lessons are great fantastic ideas
Thank you! I am having LOTS of fun with Ethan doing it 🙂
~Lisa