

Affordable Tall Planters
I have always loved tall planters flanking a front door. I find it really welcoming, and pretty to see a front door with tall planters on either side of the entry. But when I decided I wanted to buy some tall planters for my own front porch, I was shocked at the price tag. You see you can buy tall planters, for about $150.00 a pop. And if you need two, well now you have to double the cost.
And that doesn’t include the flowers or whatever you want to fill that planter with. So I decided to figure out a way to make my own. I found lots of tutorials online for making square planters. But I wanted round ones. I searched for affordable planter stand in’s. I finally decided on buying some trash cans to see if I could paint them, fill them, and pass off the trash cans as planters.
How To Make Tall Planters
First you will need to find some tall round trash cans. For the first set of planters I made, I found some tall kitchen trash cans from Home Depot for about $12.00 each. Talk about an affordable planter!

But for this next set of planters, I chose a pair of round trash cans that were a little bit shorter, so they would fill the space in front of the taller planters. These smaller trash cans were just a little bit cheaper at $8.97 each. I found them at Walmart. But after doing a little searching at home, I found a 6 pack of the trash cans on Amazon for $32.75. This means I can have 6 planters, for about $5.45 a piece! I will be buying these for next year, to make tall planters as decorations for my horse jumps.
This is what the trash cans look like, and the total height:

Of course you won’t be using the swing lid. I will have to find something to do with the lids. But for now, lets make the planters.

After I brought the ‘planters’ home, I got to work. The first thing I did was drill through the bottom of the trash cans to add drainage holes. This way if I decide to add real flowers, the water has a place to escape.

Then it was time to paint. I chose Rustoleum hammered metal in aged copper. And yes, they sell it on Amazon too! It costs $5.68 per can. And for these two planters I used less than one can of the spray paint.

When I painted the trash cans, I did a solid base coat of paint and allowed it to dry. Then I repainted the can, and then I did it again.
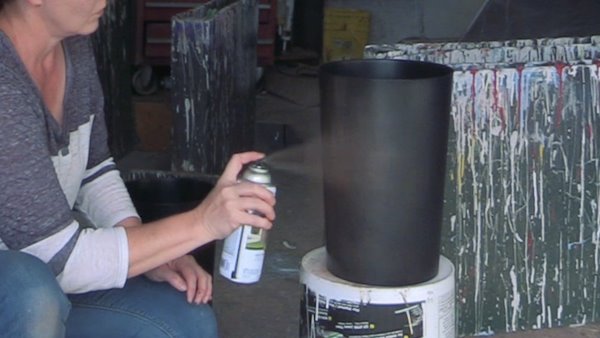
But on the third coat of paint I used an up and down stroke, and I went slower. This allows the paint to get thicker, and it adds dimension to the overall paint job.

And don’t forget to paint the inside top of the trash can too, just in case it were to show from under your dirt or flowers.

It makes the trash can look like it has some depth to it, making it look more like metal than just a copper colored trash can. I am really happy with how the final look turned out.

And if you are doing this, don’t be afraid of this paint! It is extremely easy to use, even when doing these longer, slower and closer strokes. I did not end up with one run on my planters.
After you have painted the trash cans be sure to give them enough time to dry before adding the dirt or flowers. I let mine set overnight, and then I added the potting soil.
Adding The Dirt
I found bags of potting soil on clearance at Walmart for $1.00 a bag, so I bought two. I wasn’t sure how much dirt it would take to fill a can, and I didn’t want to run out. But it only took about 3/4 of a bag to fill both planters.

And to keep the weight down, and use less soil, I put empty coffee cans in the bottom of each planter.

Then I just filled them to about 3″ from the top with soil.
Adding Flowers
I do not have a green thumb. And with it being fall in Colorado, snow could happen at any time. So I decided to use silk flowers. The dollar store and Walmart has a very nice selection of fall flowers. And I bought about 20 different bunches to use in these planters. They stick into the dirt very well.

I just added flowers until I achieved the look I was going after. And if you wanted to use real flowers, you could easily do that as well because you have potting soil, or dirt in the interior of the planter.

Then all that’s left to do is dress up the planters however you like, and wa-la! Instant gratification and beauty!

Wasn’t that easy? And don’t they look pretty? They look great, and I made affordable tall planters for my front porch! These are so easy and inexpensive to make I plan on adding some to my back porch and patio too. But that project will have to wait, for now.

I have added some links in the post in case you want to buy the supplies from Amazon. And these are affiliate links. That means if you do make a purchase from Amazon using any of these links, I get a small percentage back, which helps me to continue producing content for my blog, YouTube channel and podcast.

I also made a video of me making these planters, and you can watch it over on my YouTube channel, The Budget Equestrian.
1 Response to "How To Make Tall Planters – So Easy!"
I thought I’d pass on how I use less soil in tall planters. I have always used pea gravel or sand in the bottom of the pots but they get quite heavy and hard for me to move around or store. Place about 12 inches or so of soil. I believe that is a decent amount needed for roots to grow in. Excess water will filter away down below thru the sand or gravel. This year, however, I am going to use styrofoam peanuts on top of a brick or cement block, then the soil. And, of course, drain holes in the bottom of the plastic pot. Weight in the bottom of the pot will prevent it from blowing over and ruining your flowers.