
DIY A PVC Saddle Stand For $10.00
Recently I have been bringing my own saddle to my riding lessons. And since I have been doing this, I have tried to find different makeshift saddle stands to have my saddle sitting like a saddle in my car. So far, I have not had great results. I have tried a square pail that originally held kitty litter, that didn’t work at all. The size was almost perfect, but when I went around a corner….thud went my saddle.
I have tried a 5 gallon pail, grooming box, and even just tipping my saddle up onto it’s pommel. But I want to have my saddle sit like it’s supposed to so I decided I needed to have something real, like a real portable saddle stand for my saddle that will fit in my car.
Portable Saddle Stand Options
I have seen some different styles of different portable saddle stands for sale online. I really liked this one, it’s called the Pegasus

It hooks up to a headrest in your car and you set your saddle on it. I do like the style, and design. But, I don’t like the $180.00 price tag.
Another option I found, and really liked, and it was much more affordable on eBay. It is called a Stubbs Saddle Mates carrier, Not only does it hold your saddle, but you can also put your helmet and other gear on the bottom of it.

This thing is awesome, and it is less expensive than the Pegasus at $72.00 including shipping. But I was curious if I could make something myself.
And then I found the portable PVC saddle stand that is meant to go in your car. This one is by Cool Saddle Racks
This is exactly what I was looking for. They sell this one on Amazon for $92.00 plus $5.00 for shipping. Again, a little expensive for my liking. But I thought it looked pretty straightforward, and I was confident I could build it myself. So I did what any normal diy person would do, I looked for instructions on Pinterest. And while I found lots of images, I could not find the instructions of how to build it. That’s when I decided to go to Home Depot, buy the PVC stuff and do it myself.
DIY PVC Saddle Stand
It was so easy to make this saddle stand. Really, it wasn’t hard at all and I was able to do it in an afternoon. I even had to modify it several times to get it to be what I really wanted. I am really happy with how it turned out. And I am even happier that it only cost me about $10.00 in supplies to build it. The total cost was $20.00 because I had to buy the tube cutting tool. But the tool made fast work of cutting the pvc pipe.
I built this using 1/2″ schedule 40 PVC. I think it would be even sturdier if I used 3/4″ pipe, but Home Depot did not have the little fittings that I needed in 3/4″, so I stuck with the 1/2″ size. If you want to build this yourself, please follow the instructions below. I promise, this is a simple project to do, even if you are not a carpenter!
What You Will Need
- 20 Feet PVC Pipe 1/2″ (2 10 foot pieces)
- 4 T PVC fittings 1/2″
- 4 90 Degree elbows 1/2″
- 2 Dual 90 Degree (3 way Elbow) 1/2″
- 4 End caps 1/2″
- Tube cutter
- Vise-Grip Pliers
- Measuring tape
- Sharpie Marker
- PVC Primer and Cement
- Sandpaper
I have put links to most of the items as a reference. You can buy them through Amazon, but the PVC little fittings are a lot cheaper at Home Depot, or stores like that. If you buy them on Amazon, you will not be able to make this saddle stand for $10.00. I was able to buy the 10 foot PVC pieces for $2.20 a piece. But getting a 10′ long piece of PVC into a car could be difficult. But if you buy the tube cutter at the same time, you can just cut down the PVC so that it fits into your car, or truck. This is what we did so we didn’t have to tie down 2 pieces of PVC in our truck.
What You Will Do
Ok, so now you have all of your Home Depot treasures at home. It might look like a bunch of stuff, but don’t worry, this thing is really easy to build. But in order to build it, we need to know what pieces go where. Here is a basic diagram of where the pieces you will cut will go. I do apologize for the crudeness of this drawing, but I have no idea of how to draw “official” plans, or draw it with a computer program. So here is your schematics for where the pieces will go:

And now you will need to cut all of the PVC pieces. Cut your PVC into the following pieces:
- 4 pieces 12″ long (feet)
- 4 pieces 7″ long (sides for holding saddle)
- 2 pieces 24″ long (long sides for holding saddle)
- 2 pieces 15″ long (the legs that will attach to feet)
- 2 pieces 2″ long (connects the 3 way elbow to the spine piece for the saddle)
- 1 piece 18″ long (this is the spine for where your saddle will rest)
Assembling The Saddle Rack
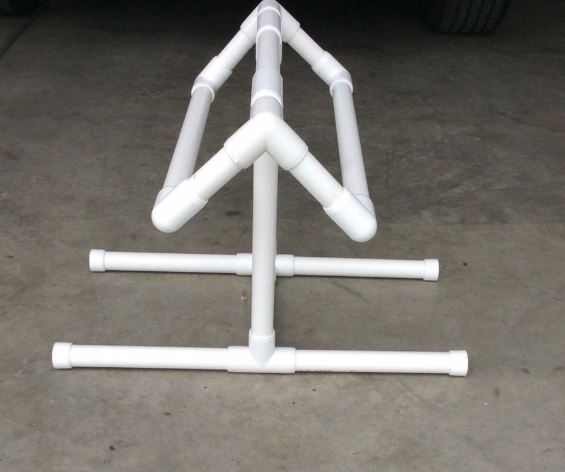
Once you have all of your pieces cut, you should have 15 pieces of PVC cut to various lengths. Now all you need to do is assemble the pieces together. In order to make that a little bit easier, here are some different photos, so you can see where the fitting pieces connect the PVC pieces together.

I almost forgot, before you start assembling the pieces, be sure to take your sandpaper, and sand all of the edges. When you are cutting the PVC, it can bevel out the edge, making it very difficult to get the pipe to fit into the fittings. To make that easier, just sand all ends of the PVC.

A side view

Viewed from the front (or back)

Another view
Together with these photos, and my high tech schematic drawing, you should be able to put the puzzle pieces together, I think!
Completing The Saddle Rack
And after you have figured out how all of the pieces go together, I would encourage you to permanently connect the pieces together. This is where the PVC primer and cement come in. First you primer the sections, and then you coat that with the cement, and firmly attach the pieces together. This will prevent your masterpiece from coming apart when you put your saddle on it.
And if it bother’s you to see the lettering on the PVC, or the purple color from the primer and cement, you could also finish the project by spray painting it with spray paint that will adhere to plastics. Rustoleum makes a great paint in many different colors that you could customize your saddle rack, and make it look very professional. For myself, I didn’t care about how it looks in the back of my car, so I left it as is.
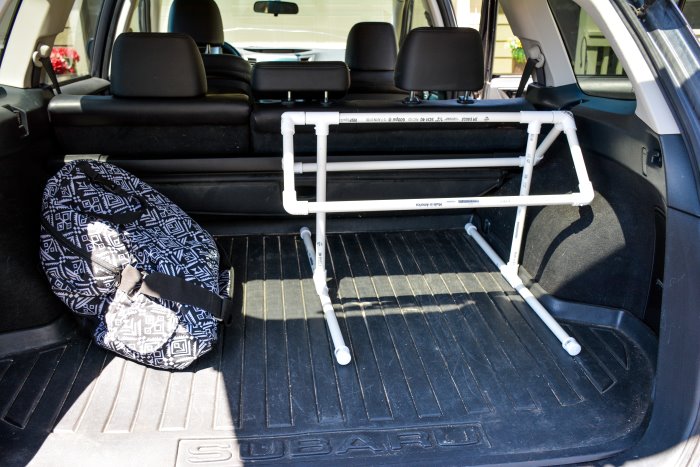
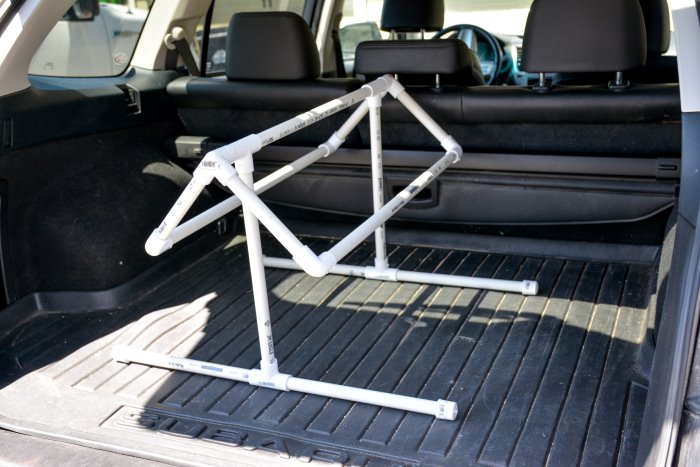
And this is how my saddle rack turned out.
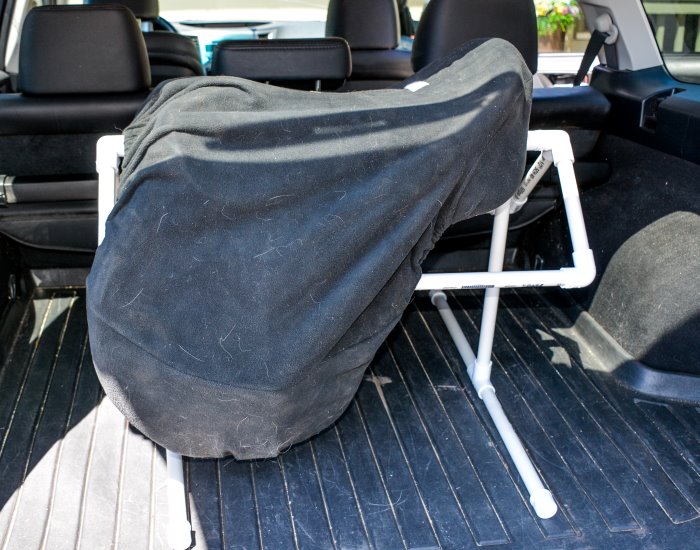
I am very happy with the results. And I made it for about $10.00 in supplies. My total investment because of buying the tube cutter was $25.00.

But everything else I already had at home, including the spray paint. I wish I could have found everything in 3/4″ to make it really sturdy, but even in the 1/2″ size, I think it is sturdy enough for my English saddle. But if you have a western saddle, you could also make this with 1″ PVC to make it really sturdy.
Safety First
And as a side note, if you are going to be keeping your saddle in your car, like I have to when I am at work, I would highly encourage you to keep your saddle covered, so people walking by your car don’t really know what it is. I have had a saddle stolen out of my car before, which really sucked, and I would never want you to have to go through that. So keep it covered, and invisible if at all possible. And always, always, ALWAYS, lock your car, especially when your tack is inside of it!
And now I have a saddle rack that can live in my car, and get my saddle to my lesson, or wherever else I might be going. If you are looking for a super affordable saddle rack for your car that you can make yourself, here you go! And if you were looking for a way to make some extra money, you could even sell these on eBay, Etsy or Amazon. There doesn’t seem to be a lot of people making these yet, and if you were wanting to earn some extra money to fund your horse habit I think this might be a viable option for you.
This is by no means the only way to make a PVC saddle rack. But hopefully this gives you a general idea of how you can get creative, and make your own saddle rack for your car.
10 replies to "How To DIY A PVC Saddle Stand For $10.00"
that is soooo cool. you do great DIYs.
Awesome saddle rack! Thank you. This was so easy. I am a mom to a horse back riding daughter. I made this rack myself in under an hour, and that includes the trip to the hardware store! Made for about $13 because I had the cement and the saw at home already. This will work perfectly in the back of her car and save wear and tear on her saddle. Thank you!
Thanks so much for sharing all the materials and instructions!!!
You’re very welcome! 🙂
Thank you for sharing this! I travel a lot to ride and I really needed a way to keep my saddle in my car safely. I have a Circle Y and sizing up for a western saddle is definitely recommended! (I used 1 inch pvc) I added a little sand in the bottom to help stability and keep it from moving too much. Also with the way a western saddle is made you need a little more support in the front I took a pool noodle or pipe insulation whatever you have, cut it down the side so it just wraps on around the pvc worked perfectly. Expect to spend just a bit more I spent $30 but I bought extra pipe just in case and I made my bottom more like a hexagon for stability as well so that included a few extra pieces + primer and cement. If you have a handy husband or know someone with a circular saw or table saw will work just as good as a pipe cutter and save you a little money.
Omg love this we made two of them. My girls love how easy it is to use
We loved this. A great thing to have in the yard when saddling up and off as well. We made one with 31″ legs for our endurance saddle to get it off the ground and found 1 1/2″ wide pvc was just enough, just a touch of flex with 31″ legs but works for us… the rest is rock solid. I’d go with 2″ legs if it was something more permanent. But we didn’t glue the legs to the top body so its a 3 piece assembly we can move around and store more easily. Thanks so much for the idea!
Thanks for posting this. I am thinking I want to make this a little taller. With the 2 ten foot PVC pieces…will there be enough for making the legs more like 24 inches tall? Or, do I probably need to buy one more length of PVC?
Thanks!
I must of missed it but how tall is this? I have a compact suv (Ford Explorer)
Thank you for the information! 😁
May of 2021 has seen the prices of the tool and material rise to $45 @ Lowes using 3/4 PVC pipe. Purchasing the Kobalt $14 cutting tool eliminated having to sand ends and is so tight I am tempted to go without the glue
Props to the OP for including the Amazon pictures since different manufacturers use different terminology for their fittings, so having a visual insured I obtained the correct pieces
Completed, my English Saddle travels right side up and even in it’s carrier, off the floor of my vehicle. Solved the ugly lettering problem by twisting pipe so letters are inwards or on the bottom, thus hidden