How To Build Cavaletti
I have had a lot of people ask me to make a video showing how to build cavaletti. And I have to be honest, I had seen a lot of different ways to do this, and I just didn’t think I could do it. That is until I saw I found this on Pinterest, and then followed the pin to the website, The Other Horse.
And the instructions were so simple and straightforward, I thought I would give it a try. And the results were so great! These are so easy to make and very affordable. Each cavaletti cost $20.00 to build. This included the paint, 2 x 4’s, screws and painter’s caulk. If you didn’t paint or caulk the cavaletti, you could do it for around $17.00 each piece. I already had the paint and caulk, so they cost me around $50.00 to build the set of three.
I did tweek the original plan a little, because I like to measure everything in equal increments. So my 2 x 4 X’s were 24″ long, and the little side pieces were 10″ long. It did create a small amount of waste, but to keep it simple for the construction it was worth the waste.
So if you have always wanted to have some cavaletti, but didn’t think you could do it yourself, let me show you how easy they are to build.
What You Will Need
This is what you will need to make one cavaletti
- 4 2 x 4 x 8
- 2.5″ screws
- Painter’s caulk
- Kilz 2 primer
- Sandpaper
- Drill
- Saw
- Orbital sander
- Measuring tape
- Pencil or marker
What You Will Do
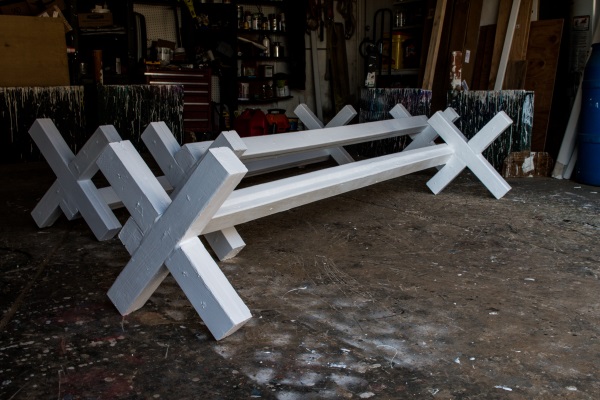
Take one of your 2 x 4’s and your measuring tape and mark off the wood in 24″ increments. When you are done, you should have 4 pieces of wood that are 24″ long. Then cut the wood with your saw. Now take another 2 x 4, and mark off the board in 10″ increments and then cut the wood.
Next, fashion 2 pieces of the 24″ pieces into an X. First I eyeballed it, and then used my measuring tape to check that each section was just over 10″ long. When I was happy with how it measured, I secured the center of the 2 longer pieces of wood. Then I attached 10″ pieces of wood to each side of the “X”.

When I was finished, the X was able to stand without help. Adding the 10″pieces makes the X sturdy, and look like a real cavaletti end.
Repeat this process with the other 2 pieces of 24″ wood.

Now set up your X’s, and grab another 2 x 4. Rest this 2 x 4 between the X’s. Secure the 2 x 4 to each of the X’s. And then grab your last 2 x 4 and place it on top of the one you just attached to the X’s. Again, secure the second 2 x 4 to the first one. It also helps to add some screws along the length of the board on both sides so that it is secure.

If you want, you can be done now. The cavaletti could be used just like this. However, I will be using mine outside, so I want to make it be able to withstand wind, rain, snow, and sun. And I wanted them to look “finished”, so I filled in all of the gaps with painter’s caulk. And then I painted each cavaletti with 3 coats of Kilz 2 primer. I really like this primer. It dries fast, and protects the wood while it lives outside.

Easy One Day DIY Project
If you have always wanted some cavaletti, I promise you, you can do this! I am so happy I finally did it!
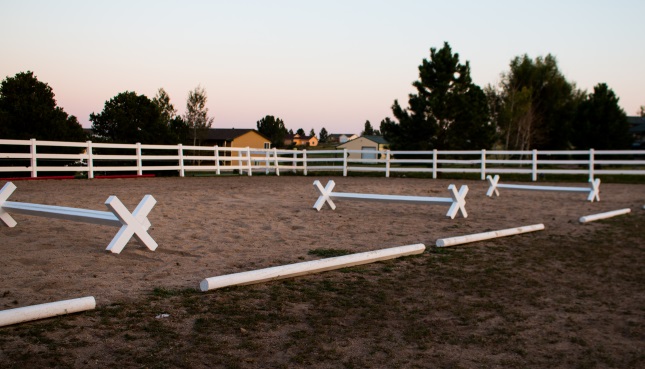
Cavaletti are a fantastic tool to use with your horses. You can do so many different exercises with these. I wish I had made them sooner, but better late than never right?!?

Thank you to all of you guys for asking me to make these! I think they turned out great, and so far the horses are really enjoying them, well, I am enjoying riding my horses over them!
12 replies to "How To Build Cavaletti – So Easy!"
Why did you use 2x4s for the long part (pole) of the caveletti instead of a 4×4? Do you think that would work instead of staking the 2x4s? Thanks!
It was easier for me to use 2 x 4’s, vs the 4 x 4’s. 🙂
Thanks, Lisa! I’m just now getting my full arena set up and the next step will be building the jumps, which I’ve decided I’ll start with the cavaletti. And the question I had was answered in the question & reply above about using a 4 x 4 for the center pole.
I think gluing and screwing 2×4 for the jump portion will make it stronger. I plan to laminate 1×3’s for my x’s as I have a lot of them. I think I can make these as they look doable for me. b
I’m going to use 8 foot landscape poles instead of 2x4s because they are treated and cheap!! They also have 2 rounded sides and 2 flatter sides so I think they’ll be ideal!
Excellent idea! 🙂
With this shopping list, how many cavaletti set does this make?
These are the materials to build 1 cavaletti 🙂
[…] Tutorial courtesy of Budget Equestrian! […]
Thank you for posting this DIY, I just made 3 cavaletti’s for our Pony Club and they LOVE them! It did take me a little longer to build, but I’m a beginner. Thank you again!
Hi Suzie 🙂
That’s awesome!!!!!
These are dangerous… can hurt coronet bands and Pasterns with sharp edges …
Best practice using 4×4 and planing off corners to create an octagon, softening the angle of the edges.
Hope this helps ❣️