I wasn’t sure how to title this post. I thought about “How to build this $719.00 jump for $65.00” but that just didn’t look right. Besides, I just told you here, right now. But I did want to show you how to build a professional quality horse jump yourself, and that is what today’s post is all about.
So now that is out of the way, let’s talk about building your own jumps.
Horse jumps are expensive to buy, no matter where you find them. You can look online, and find somewhat reasonably priced jumps. And you can find beat up ones on Craigslist even cheaper.
But to truly get affordable horse jumps, you need to build them for yourself. And I wanted to give you an example to begin with.
How Much Does A Horse Jump Cost?
If you were to look for an affordable jump (just a single jump) you would be looking at spending around $700.00

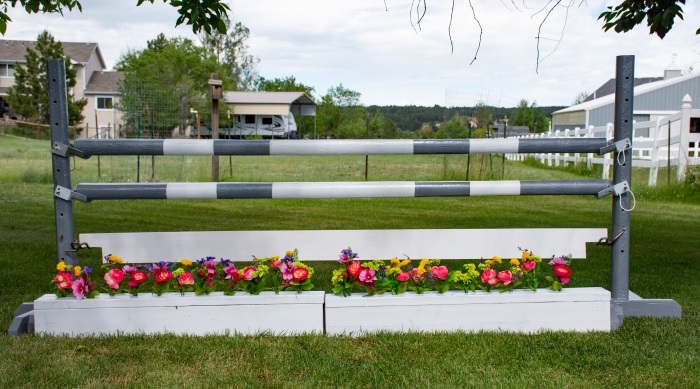
This is a jump by Burlington. They are a huge manufacture of horse jumps. If you look on Dover’s or Stateline Tack, you will inevitably see Burlington horse jumps for sale. And the jump in the photo above will cost you $719.00 to buy. That does include the shipping, but still, that’s a lot of money for one jump.
Especially when you can build it yourself for less than $100.00. Yes, You can build this very same horse jump for less than $100.00.
So let’s do the math. If you were to build your own jumps, you can make about 7 jumps, customized with your colors for the same amount it would cost you to buy one jump.
And something else to keep in mind, when you order the jump you have to wait for them to make it. So you will be waiting for your jump for about 4 to 6 weeks before it’s delivered to you. In 4 to 6 weeks, you could not only make enough jumps for a Grand Prix Jumping course, but you could probably make 2 or even 3 sets. Which you could sell, to offset your cost of building all of the jumps.
Building A Horse Jump For Less Than $100.00
So I want to show you how you can build this jump, for around $90.00. And that included the jump cups, the flower boxes and even the flowers.
If you want to build this jump for yourself, keep reading.
Here is the list of materials:
To make a jump, like this one with 5 foot tall standards with max jumping height being 4′ 9″ if your holes are every 3 inches. Or 4′ 8″ if your holes are every 4″. Personally, I find the hole spacing at 4″ to be perfectly adequate for schooling. And the rails are 8 foot long. If you want to have your rails 10 or 12 foot long, you will need to get bigger (and more expensive) lumber.
- 3 Cherry tone landscaping timbers (8 foot long)
- 3 2 x 4 x 8
- 3 2 x 6 x 8
- Decking screws
- 2 Pair of jump cups (I prefer Dapple Equine, but they are more expensive)
- 20 Flower bushes (you can find them for $0.97 at Wal Mart)
- Paint (I prefer Rustoleum oil based paint)
- Kilz 2 Primer
And you can make this even less expensive by omitting the flower boxes. But for the sake of making a jump just like this one, I am making the flower boxes. They are really useful in the arena, and are an affordable filler for your jumps.
Build The Standards
Now I’m not going to go into the details of building the standards here. But you can read this post to see how to make your own standards.

And you can make the standards whatever height you would like them to be. For this jump, I was duplicating the Burlington jump, so mine are 5 feet tall.
To build your own standards you will need a saw, 18 volt drill, and orbital sander. I prefer to use screws for attaching the 2 x 4 feet to the upright portion of the standards. It makes them very secure, and less chance of ripping out than using nails.
And after you get your standards built, then you need to prime and paint them.
I prefer using Kilz 2 primer because it is safe for both interior and exterior items, which my jumps are. And it is water based, making clean up easy.

Then I give the standards a coat or two of the rustoleum paint. This paint is the best for horse jumps. And you can never go wrong with the white standards. If you want to get fancy, and have them color coordinated to your rails, you can do that too.
Making The Rails
This is pretty easy, you just need to prep the rails. No cutting involved. I like to sand the timbers, and then fill any voids with caulk. This will not only make your rails look better, but it will help them hold up to living outside.
And after the caulking has dried, each rail gets several coats of the Kilz 2 primer. Again, it will help your paint job last longer, and your jump look more professional.

Once your rails are primed, then you can add the finishing coat. Now the jump in this example has solid color rails. But I like stripes on mine, so I added some stripes. And I had some left over blue paint from painting my front door and porch swing, so I used it for the striping of my rails.

If you want to add stripes, I suggest using Frog Tape to tape off the stripes. It is the best tape for getting crisp lines with no bleed through between your colors.
But, before you start adding the stripes, make sure the solid color is completely dry first. It does take a lot of time for drying time, but it’s worth it in the end.
Flower Boxes
Easy flower boxes can be made using 2 x 6 lumber. You simply buy 2 x 6’s, and then cut them in half. So you should have 6 pieces of wood that are 4 foot long. Then you put two pieces on the ground, and put the top on, and that’s it.

Then I measured off where I wanted to holes to go, and drilled the holes using a 1/2″ spade bit.
These holes are where the flower bunches will go once the boxes are done. Then the boxes were sanded, and the edges were caulked to give each box a more seamless appearance. And then I painted them with a primer coat of Kilz 2 primer.
After they were dry, I gave them a finish coat of Rustoleum High Gloss White.
I thought about using the gray Rustoleum paint, but I wanted to be able to use the flower boxes with other jumps so I opted for the white.
Finding Flowers
And this is my favorite part of this project, searching for the perfect flower bunches to go in the holes of the flower boxes.
I already have a lot of flowers, but you can never have too many, in my opinion. So I ventured out to Wal-Mart to see what I could find. This is my first place to look for flowers because I can usually find good bunches for $0.97. That is cheaper than the dollar store, and the flower bunches are bigger. So I find I can get more for my money by going to Walmart.
And sometimes you can find clearance flower bunches too, which makes it even better.

Sometimes I like to add extra flowers for the fullness factor. I just love the way it looks. And adding more flowers is always a good thing, again, in my opinion!
Different Options
You can build this jump in a weekend. You can actually build it in an afternoon, but allowing for paint drying time, it takes about a weekend for the jump to be completely ready for use.
And when it is finally done, there are a lot of options you have with this simple jump.
You can make a cross rail, or you can make a simple vertical, or just use one rail with the flower boxes. And what about using the rails on the ground, boxing in the flower boxes, or a partial cross rail? The possibilities are really outstanding for a homemade jump you made for less than $100.00.
Build Your Own Professional Quality Jumps For Less $$$
Like I said, so many options from just one jump! And you can make this yourself for around 12% of the cost to buy one. And then you factor in the time factor, meaning you don’t have to wait 6 weeks to get your jump, and you win again.

Just think, if you made a few jumps a week for 4 or 5 weeks, you would have a completed course and it will cost you less than 2 ready made jumps. I don’t know about you, but I would much rather have multiple jumps than a single jump.
And if you wanted to cut costs on this jump, omit the flowers and the flower boxes and you can build it for around $50.00. Not too bad for a weekend project, wouldn’t you agree?
4 replies to "How To Build A Professional Quality Horse Jump Yourself"
Such an informative article.
Thanks for share.
Thanks for this super detailed info! I am using this quarantine time to get some farm projects done and your articles are really helpful.
Very amazing informative blog …..Nice to read …Thanks For Sharing This Amazing Article
This was easy. thanks!