
Have you always wanted to have your own jumps? Or is you favorite equestrian begging you to buy a set of jumps? Have you looked into buying a set of jumps, but just can’t justify spending thousands of dollars for such a luxury?
I know, I’ve been there. Which is why I decided to figure out how to build the jumps myself. And over the years, I have not only built hundreds of jumps, but I have refined the process until I have been able to create beautiful jumps for less than $100.00 a jump.
And just think how awesome it would be for you to not only have your own jumps, but to be able to build a couple by Christmas! That is what I am going to show you how to do today!
Building A Horse Jump
I wish that I had someone to build a horse jump for to give as a gift on Christmas morning. I mean, I have a lot of people that I could build a jump for. But being able to see the look on a loved one’s face as they go out to the arena or barn and see their excitement of a brand new jump just waiting to be used would be priceless.
And it really doesn’t take a lot of time, or a lot of skill to build a jump. So this is a DIY project that would be super easy to get done in a weekend. Actually, you could probably get 3 or 4 done in a weekend if you dedicated yourself to the project.
So if you would like to be able to build a horse jump this weekend for yourself, or as a gift, keep reading.
How To Build Jump Standards
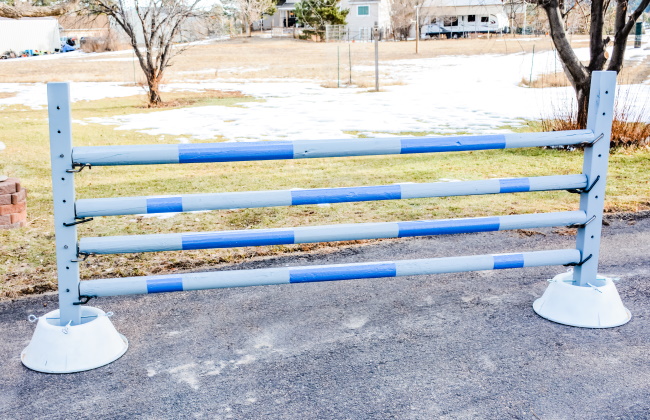
One thing I have decided to do with my own standards is to make them portable, and break down so I can store more of them in a small space. For jumps at home, schooling standards are perfect. They require less wood, and are so so sooooo easy to build this way.
You only need 2 plastic Christmas tree stands, a 4″ x 4″ x 8′ piece of wood, some paint (spray paint and exterior grade paint) and a few tools.

First, cut the 4 x 4 in half. This will give you 2 48″ pieces of wood. This will be the upright portion of your jump standard.

Then with a pencil and measuring tape, mark off in the center of each piece every 3″ or 4″. This is where you will drill the holes for your jump cups. Try and keep the holes in the center of the 4 x 4. And use a spade bit. I like to use a Irwin self-feeding 1/2″ spade bit. This thing is tough, and lasts forever. It also makes the holes perfect, and less cracked wood on the back side of the hole you are drilling.

I start my holes at 12″ up on the standard upright because I don’t need to set a jump cup less than that on the standard. I also like to make my holes 4″ apart. You don’t need to have holes every 3″, but if you want to, go ahead and drill holes every 3″.
Repeat this process on the second piece of 4 x 4 wood.

Next, sand all the surfaces. The more you sand, the smoother the wood will be. So sand, sand sand, and sand. It will give a very smooth surface and help your standard to look great. If you have a dremmel tool, you can also use this on the holes to sand them smooth. This is an extra step, but it really makes the standard look professional.

I love my dremmel. And they are way more affordable than they used to be. You can buy a dremmel with a nice set of accessories on Amazon for around $40.00. And they last forever!
Alright, your uprights are ‘built’ and sanded, all that’s left to do is paint them.
Paint Matters
The type of paint you decide to use does matter, so choose carefully. You will want to use an exterior paint that can stand up to the elements, as well as being knocked around.

My first choice is Rustoleum oil based paint. It’s strong, and lasts a very long time. It can handled being knocked into, as well as stand up to the extreme temperatures, both hot and cold. My jumps usually end up living outside year round, and the Rustoleum stands up beautifully.
Ok, back to painting!
I set my standards on a flat surface, and raise the ends. This way I can paint three sides at one time. Once the three sides have dried, I flip over the wood, and get the fourth surface. Repeat this process with your other standard(s) and allow them to fully dry.
Painting the Bases
While your standard uprights are drying, you can paint your bases. You don’t necessarily have to paint the bases, but if you want it to look like a matched set, paint them.

First, you need the base. And this time of year is almost perfect for it. I say almost because the absolute best time of year is around the end of January when Walmart has their Christmas products 90% off. But even now, they are affordable at around $8.00 a piece. If you made the bases out of wood, you would spend around the same amount of money.
This is one products I would NOT buy on Amazon. I mean you can, but it is really expensive. The Holiday Time Christmas tree stand will cost you around $9.00 at Walmart, or $27.00 on Amazon.
This is a wonderful base for your standards. It also makes it easy to break the standard down, which makes it easier to store because it takes up a lot less space.

But I don’t want it to look like a Christmas tree stand, so I paint mine. Spray paint works the best, and it will take about a can of spray paint for every 2 bases you are painting. Be sure to get the bottom, inside, and around the lip edge. And give each stand a couple of coats of paint to make it look perfect.
Assembling the Standard
Once your bases and uprights are dry, you can ‘build’ the standard. Start the screw eyes without the upright in place. You want to spin those puppies down almost all the way. Then put the upright portion of the jump into the stand, and spin the screws eyes down the rest of the way. You want to make sure they are snug. This is going to give you the stability you need to keep the upright, upright.

And you will notice there is open space on the inside of the stand. If you want to give even more stability to the standards, fill the open space with sand. This will make the standard extra sturdy. But it makes it heavier to move, so I would not put the sand in until you are out in the arena. If you don’t have sand in your arena you could use to fill the base, just buy a bag of sand from Home Depot. It costs around $5.00 a bag. And if you do this enough times, you will be adding sand to your arena each time you dump out the base to move it!
Jump Cups
The last thing you will need for your jump standard to make it usable is a pair of jump cups.

If you want to get fancy, you can buy the Dapple Equine one handed jump cups. They run about $23.00 a pair, but they are so worth the investment. They last forever, and there are no pins to lose. If you are only building one or two jumps, these would be my recommendation. They are the absolute best.

But if you want to go the more affordable route, you can buy a pair of regular jump cups for around $5.00 a pair at State Line Tack when they are having a sale. And the more you buy, the more you save. If you buy 6 or more pair, the cost drops to $3.77 a pair! They are steel jump cups, but they don’t last forever. And they also hang a little bit on the standard, so it doesn’t give you that perfect look. But the do work, and they give an affordable option for buying jump cups.
Making the Rails
Ok, we have built the standards, the only thing left to do is to make the rails. Now this is the really fun part. Well, I really enjoy it, I love to paint! And I get my inspiration for painting different rail patterns by trying to mimic what I see at the horse shows.

For this example, I found a really cool Antares jump that I just loved the gray and navy blue combination. Unfortunately, the blue I had was more of a periwinkle blue. Oh well. It still looks cool, but I think I want to do some navy ones too.

Once you have an idea of how you want your finished rails to look, you need to prep your rails. I prefer to use the Cherry Tone Landscaping timbers that you can buy at Home Depot for around $4.00 a timber. The only down side is they are only 8 foot long. But if you have a small arena, 8 foot wide jumps are fine. On fact, if your horse gets used to always jumping 8 foot wide jumps at home, he will jump the wider 10′ and 12′ jumps even better. So 8′ long rails are fine.
First, sand the timbers smooth. The smoother you get them, the better.

Then fill any cracks and gap with painter’s caulk. This will give each rail a seamless appearance, and make the finished product look the best. And after you have caulked all of the cracks, this is when you will primer paint. I like to primer paint when the caulk is still soft because it helps to secure in the caulk, and make it look smooth.

And it’s worth mentioning, to keep your rails ultra smooth, drill some 3″ long screws into either end of the timber, and set it up on the saw horses, or whatever you are using to paint the rails. It helps to keep the rails off of any surface and makes it so you can paint the entire rail at one time.

My favorite primer paint is Kilz2 primer. It is safe to be outside, it seals the wood, and it’s affordable. You can buy a 2 gallon bucket of the paint for about $26.00 at Home Depot.
And if you are going to leave your jump white, you can do a couple of coats of the Kilz2, and your jump is done! This is the absolute best primer paint there is, in my opinion.
I like to do 2 coats of primer before the finish coat. And if you do thin coats of paint, it will make your rails look even better.
Allow the rails to completely dry before moving on to your finish color.

When applying your finish color, if you are using oil based paint, it will take a long time for each coat of paint to dry. Keep this in mind when you are painting. Again, I like to do 2 coats of finish color on each rail and allow it to completely dry before adding any striping to the rails.
And once the rails are dry, then I stripe!
Adding stripes is fun. You can do one color, or two, or even three. It’s up to you. For this jump I added two colors for stripes.
To determine the spacing of your stripes grab a tape measure, and a pencil. If your rails are landscape timbers, and 8 foot long the center of your rail will be 48″. If you are adding a center stripe, mark off the 48″ center. Then depending on how wide you want that center stripe to be, count off 6″ on either side of center for a 12″ stripe, or 12″ for a 24″ stripe, or whatever you want it to be.
Then mark off where you want stripes to be on either side of that, if you are adding them.

Next you will tape off the stripe. The absolute best tape I have found for painting jump rails is the green Frog tape. The blue painters tape does not work nearly as well as the Frog tape. The green tape makes for crisp lines and comes off easier when your project is done. And honestly it isn’t that much more expensive than the painter’s tape.
If you want to have the best striping, and less headache, buy the Frog tape. It really is the best tape for painting stripes on horse jumps.

The same rules apply for the stripes as it does for the rail painting, 2 coats of paint and allow drying time for each coat of paint.
Almost Finished
Once you have allowed everything time to dry, now you are in the home stretch, your jump is almost complete! Now you can peel off all of the tape, and inspect your rails. If there are any oopsies, this is when you will finish them. And after you have allowed dry time for any errors, then remove the screws from either end of your rails.
How to Build a Horse Jump By Christmas

Now all that is left for you to do is to set up your masterpiece. If you want to make it even more special, you could add a big red bow, and a giant gift tag. Talk about an impressive Christmas gift!

And if you are really ambitious, you could build an entire set of jumps, and set them out in the arena for Christmas morning. Now that might be a bit ambitious, but could you imagine the look on your equestrians face if they saw this on Christmas morning??!?!?!

I know I would be stoked!
2 replies to "How to Build a Horse Jump By Christmas"
You should sell your jumps online!as they are super affordable and you’d probably have loads of interest!!
Hi Lisa,
Thank you so much! I have sold them in the past, and when I need a little extra cash, I build a bunch of jumps to sell. For a couple of years I did sell them. But the fun I had in making them went away once it became a job. So now I just do it from time to time.