Well since winter is holding on I decided to do an inside project for today’s blog post, and video. I haven’t made stall sings for a while, and it’s an easy project. So I thought I would walk you through how I make a stall name plate (or sign) for my horses.
This is a fun project that is so easy to make. Especially if you are like me and have a lot of random wood taking up space in your garage!
Home Made Stall Sign
Making these signs were an easy afternoon project. And while I had everything I needed to make these already, I have provided some links throughout this blog post in case you want to make these, and need the supplies to do it yourself. The links included in this article may be affiliate links, meaning if you click on a link and make a purchase I might receive a small commission which allows me to continue to do what I do on my blog.
You can use whatever wood you have, but I happen to have some MDF molding that I had left over from another project. The piece that I had was long enough for me to make 2 signs. One for Frisby, and one for Ethan.

I cut out the wood to be 14″ long. And then I drilled some starter holes for where I will attach the name signs. I wanted to do this before I sanded the wood. Then I sanded the wood smooth. To get it really smooth, first I used 120 grit sand paper and then 220 grit sand paper.

There were some slight imperfection in the wood, but I wasn’t too worried about it.
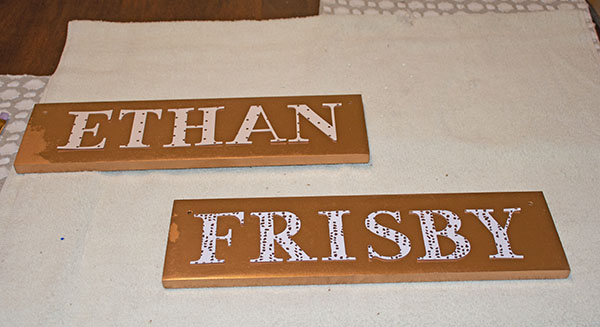
And after the wood was sanded super smooth, I wiped away any dust and then painted the wood with Krylon foil finish spray paint.

I love the color of this paint, and while I was wishing it would be a true foil finish, I knew it probably wouldn’t be as shiny as it was on the can lid. So in order to get it as shiny as I could, I did 4 coats of paint.

I let the paint dry completely in between each coat of paint.
And while the paint was drying, I found some card stock paper that I could cut out the letters with by using my Cricut machine.

I love this little machine! For me, this was a great investment and I use it all the time. I found mine second hand for less than $100.00.
I used the font cartridge Everyday Fonts, and it was the F5 option. The letters I made are 2 1/2″ tall, and I used all capital letters.

After I had cut out the letters, I attached them to the wood planks that I made. Mod Podge is a fantastic glue. And I put the Mod Podge on the back of the letters and lined them up on the wood.

Once the letter has dried, I gave a thick coat of Deco-Art Triple Thick high gloss glaze.
And once the sealer had dried for 24 hours, my signs are ready to hang up!
Easy Afternoon DIY
I won’t be hanging them up quite yet. I am waiting until I redo my horses paddocks later this spring. But having the pretty stall signs for both my boys will help motivate me to getting my project completed.

I think they turned out pretty nice for a free project. Everything I needed to make these I already had. So the entire project cost me $0 dollars! And it gave me a fun project to do in anticipation of spring!