
How To Ride In The Dark
I am getting excited for November, and usually I’m not to excited about the colder weather of fall. But this year is different. Because I am participating in the COTH Lose the Leathers November challenge. If you aren’t sure of what that is, you can read more about that here.
But one challenge I have been facing is how am I going to ride in the dark? This has been my biggest bugaboo about the winter. Since I don’t have an indoor arena, I don’t have a way to ride after dark, unless I want to ride in the dark. So I decided to do something about that, and it was a lot easier than I would have ever thought!
Making A Lighted Riding Area
Because I don’t have electric at my barn, or lights, I decided to make some. And I was able to do it for just over $100.00

The first thing I did was determine where I would ‘build’ my lit up area. I chose an area separate from my riding arena. Mainly because I didn’t want to invest a lot of money in building light poles for my entire arena. And secondly because I won’t be riding for hours and hours in the dark, so I didn’t need to have a huge area. Just enough that I can put Frisby through his paces for a half hour or so, if the temperature is above freezing.

So I decided to use the front area of Frisby’s turn out. It could be considered a small arena.
Then I had to figure out how to light up the area.
Lighting
We are so lucky to have so many options when it comes to shopping today. We can find pretty much everything we need for our homes, and horses online. And lighting is just one of those options. I chose these outdoor lighting strings. I read so many reviews, and looked at so many specifications before I finally committed to these:
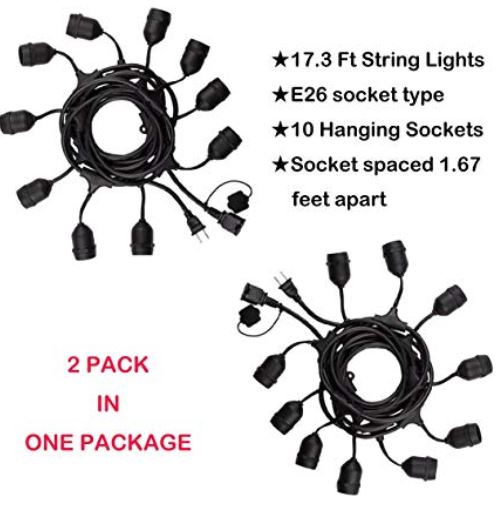
And talk about affordable. I was able to get 2 light cords for less than $25.00! Tied together, the cord will give 20 lights at about 34 feet long in total length.

And then I had to find lights for the cord. I opted for the Sylvania LED 8.5 watt bulbs which are equivalent to 60 watts. The light bulbs are great because they have a plastic body, so even if they drop, they won’t shatter like a regular light bulb. And they were cost effective too. I got a 24 pack of light bulbs for about $23.00. So for the lighting system, my total investment is about $48.00. Not too bad right?
Hanging The Lights
Ok, I have the lighting, now I just have to figure out how and where to mount the lights. Basically I needed to create light poles, but I needed to do it affordably. I decided to get some readily available lumber, 1 x 2 x 8’s to be specific. I bought 7 pieces of wood, because I am going to connect them to 7 of the fence posts.

First I wanted them to last, and also blend into what I already have, so I painted the pieces of wood white using my Kilz2 primer, and then allowed them to dry.
It took 3 coats of paint to make them bright white like this.

And once they were dry, I predrilled holes to attach some hooks. These hooks will be where I hang the lights. The hooks cost $7.69 for 50 of them. And I attached 2 hooks to each of the pieces of wood. I figured it would be easier to attach the hooks prior to mounting my ‘light poles’.
And then it was time to stand the poles.

I bought 26” long clear zip ties and then I attached each piece of wood to my predetermined fence posts. I attached the wood poles to the outside of the posts. The zip ties cost $15.32. These were almost as expensive as the lights themselves, but well worth the cost.

And after I had all of the posts up, then it was time to hang the lights. Since they are 8 feet tall, it was easier to use the help of a ladder. It took a little bit of time, but again, well worth the time investment.
Let There Be Light
So now that I have the poles up, and the lights on the poles, now I have to get power to the lights. I opted for running a long extension cord out to my lights from my garage.
This makes the most sense, because there is electricity in the garage, and it’s closer to where my ‘lighted arena’ is. And I won’t have to run an extension cord through the paddock area, which could cause a tripping hazard. It also makes it easier for me to run the cord out to the area on my way out to ride Frisby.

The total wattage of electricity needed for my lights is only 170 watts, so not a lot. So I was able to use a lighter weight extension cord, meaning I could buy a cheap one. I will not be using this all the time, and probably only for about an hour a day, so I didn’t go the cheapest 16/3 cord, but I opted for a Coleman 14/3 cord. It is rated for up to 1625 watts, so hopefully it will last a long time. It wasn’t the most expensive, but it does have good reviews. It cost $37.77 on Amazon.
And once they were all built and hung, I just had to wait for the darkness to arrive so I could try them out.
DIY Riding Arena Lights
Overall, I am really happy with how my project turned out. And all in, I spent $113.95 to make a lighted riding area.
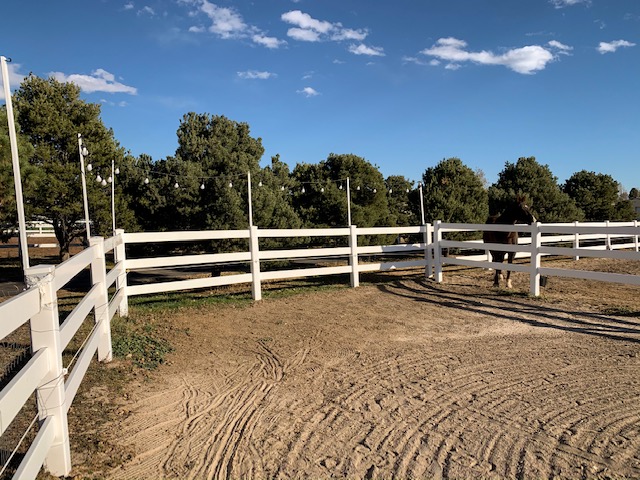
It doesn’t look too tacky during the day

And at night, it looks even better!

So if you have been trying to figure out how to ride in the dark, here is your solution!
I am so glad that I decided to do this. And as always, if you are a more visual learner, I have a video showing the entire process of making this happen.
And as long as it isn’t snowing, I can participate in the COTH Lose the Leathers challenge. I have just upped my riding game!
The only way I could make these even better is if I had an actual indoor arena. But since that won’t be happening where I currently live, my makeshift outdoor riding area for nighttime riding will have to do. And for me, it works just fine.
3 replies to "DIY Riding Arena Lights"
This is is legit, I am obsessed. Great job!
Try the “daylight” bulbs. They are much brighter than the soft white.
[…] building/renovating her outdoor arena. Everything from expanding it to adding mirrors and lights. She really inspired me when it came to building (er, identifying) my […]