
Day 6 of Building a Set of Horse Jumps
Here we are at day 6 of building your own set of horse jumps. Can you believe what you have accomplished so far? And like I said before, even if it has taken you longer than 6 days, it doesn’t matter! What matters is you are doing it!
The best part of making your own set of jumps is how much money you are saving yourself by putting in the work and doing it on your own. Not to mention the sheer satisfaction of creating something like this for yourself, from nothing. That is a HUGE win for you, and it will motivate you to do other things, once you see that you can do it!
Ok, enough praise for now….
Day 6 is a catch up day. If you have extra coats of paint that need to be completed, or started, this is when you do it.

Go back to all of your pieces and look at them. How do they look? Are you happy with the patient job you did? How about the sanding? Did you get the pieces smooth? How about the screws, are they all flush, and invisible? Meaning did you cover the holes with caulk? And speaking of caulk, are there any open areas you see that need to be filled in and repainted?
All of these steps should be completed today. So lets go back to each piece, and make sure we have them just about ready to be put to use.
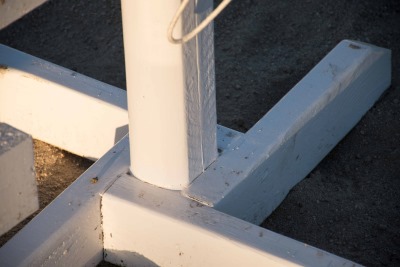
The Standards
If you have painted them already, this is fine. But look at them closely, to check for any imperfections. If they need to be sanded for a rough edge, re-sand it. Yes, it will remove some paint, but then you can do touch up. Having it sanded will look better anyway than leaving a rough edge.

You also wanted to be sure there are no visible cracks. If there are, get out your caulk and re-caulk the area.
How about the drilled holes? Is there any paint runs? If there are, sand those as well. If there are any splintery wood pieces around the hole, you can sand this too. I like to use a dremmel for doing this. It does take some time to do every hole front and back, but I am really OCD when it comes to how my jumps look, even the drilled holes. I want to see perfection from every angle.
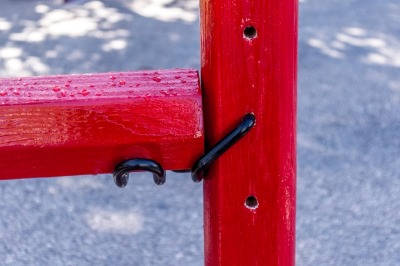
Also check where your bases meet the upright to make sure there are no gaps or empty spaces. If there are, re-caulk them. You can also make sure the screw heads are covered, and the base looks seamless, so you cannot tell where the screws are located.
These are just some extra steps to take to really make your standards look professional, and of high quality.
Once you have done all of your quality control, and addressed these things, then you can add your final coat of high gloss paint.
Be sure to use the paint sparingly, as it will run. And if you just had to clean up a lot of little paint runs, you don’t want to have to do that again, so go light with your hand, and the paint. Remember this is the final coat of paint, so you want it to be perfect!
After you have gotten the paint how you want it, be sure to put your standards somewhere to dry where they will not be bumped, or this could mar your paint. This is where I use old doors to create tables for my standards to dry.
The Rails
You have already completed all of the hard work on the rails. Cutting them is the most difficult part. Painting them is simple in comparison, especially if you take your time to do it right.

For my rails, I like to use 2 coats of primer, followed by 2 coats of finish high gloss enamel. The most challenging part I have found with the rails is that it is easy to get a heavy coat of paint on them, and then you will have runs in the paint. The reason I say it is easy is because once you see how beautiful and glossy the paint looks on the rail, it’s so tempting to add more! But trust me…..don’t so it!
Although it will be gorgeous at first, the pain will run, and turn your beautiful masterpiece into an ugly mess!

Instead of getting in a hurry, just have all of your paint ready so you can do one thin coat of paint on the exposed sides of the rails. Remember, you do not want to flip the rails, because the paint will get marred.
By taking your time, and going slowly not only will you have beautiful rails, but you will also have well protected rails that will stand up to heavy use and abuse once you get them into your jumping arena. Don’t be tempted to rush this part, so you will have a beautiful outcome.
You could create your rails first, before you start your standards, because then each day you could add a coat of the oil based enamel. So by 7 days, you will have at least 3 coats of enamel on the rails, and they will be ready to use by the end of the week. It’s up to you how you like to do this. Just figure out a system that works the best for you.
The Gate
Just like we worked on the rails, we will do the same with the gate. We will also check for any spits in the wood, and make sure the screw holes are all covered.
I like to do this the same time I am doing the rails, because it will take a long amount of space, and I can set the gate on the tall stands.
I again do thin coats of paint, and make sure to not have any runs in the paint.
The gate usually goes pretty fast as you only have two sides to recoat.
The Raised Rails
This is the same as we have been doing with every other piece of equipment. You want to check for any visible cracks, and re-caulk, as well as sand any rough edges. This is where the detail work really comes into play. It is important to spend a little extra time working in these tiny details, so your equipment will last a long time, as well as look fantastic.
Once you are happy with the cleanup work you have done, you can repaint any areas with your finish coat enamel. Again, you want to have an area you can set these to dry so they will be out of the way, and can be undisturbed until you are ready to take them out to be used.
Almost the Big Finale!
By the end of day 6, you should have everything drying with their final coats of paint. If you have not gotten your jump cups or flowers yet, this would be a good time to make sure you have what you need, because this is basically it. After today, your jumps will be ready for you to move outside, and put to use.
So tie up all your loose ends. Order your jump cups, or go shopping to your local tack store. Stop by the dollar store and pick up some flowers to use for your raised rails/flower boxes. And get your riding area ready for some jumps!
Tomorrow this set will officially be complete, and I will have some different ideas of how you can set up some different jumps, and gymnastic exercises for you and your horse.
Disclaimer: There are affiliate links posted here. If you decide to visit these places, and purchase something from them, I do receive a s mall commission from the company.