

Building A Coop For A Horse Jump
A long time ago I had made a video of how I went about building a coop for a horse jump. And I had someone ask me for the instructions of the build, and I thought I could point them to my blog post about it. But after searching through my posts, I found I had not written one yet!
Building a coop isn’t too hard really. It does take a little bit of time, but this project is a fun one if you are looking to add some fillers for your horse jumps.

And I think I mentioned this before, but I will do it again. I try to make the best use of my time. Since the daylight is getting less and less each day this time of year, this is when I use my evenings to make projects, especially horse jumps. When I am building jumps, I usually do it in stages and working on a project for an hour or 2 in the evening after work, then if the weather is good, on the weekend I can use the jumps that I have made throughout the week!
If this is something you can do, let me give you a project for the upcoming week….
How To Build A Coop
Coops are a necessary component in the Hunter ring, and even in cross country courses. The also add an interesting element to a jump. There are many different types and styles of coops you can create. And you are really only limited by your budget, and your imagination.

But for the coop I built this is what I did. The coop I built was in 2 sections, and each section is 5 feet long, making the total coop 10 feet long.
There is a lot of lumber needed for this project. I think I had 4 2 x 4 x 8′ pieces of wood, and around 20 1 x 4 x 8′ pieces.

What You Will Need
- 2 x 4 x 8′ lumber
- 1 x 4 x 8′ lumber
- 2 1/2″ wood screws
- drill bit
- Drill
- Sandpaper
- Orbital sander
- Circular saw, or table saw
- Jigsaw
What You Will Do
The first thing to do is cut all of the wood to the length you will need. Almost all of the cuts are straight cuts, until you get to the braces, or the “A” sections. The A’s will require a different angle. I did this part first because it was the most challenging.
But before I get too far ahead of myself, lets talk about the cuts of lumber you will need.
- (8) 20″ 2 x 4 pieces of wood
- (8) 22 1/2″ pieces of 2 x 4 wood
- (8) 5″ 2 x 4 pieces of wood
- (16) 60″ pieces of 1 x 4 wood
After all your wood has been cut, sand the wood.
Building The Coop Bases
To build the bases, you will need the 20″ and 22 1/2″ pieces of 2 x 4 that you cut.
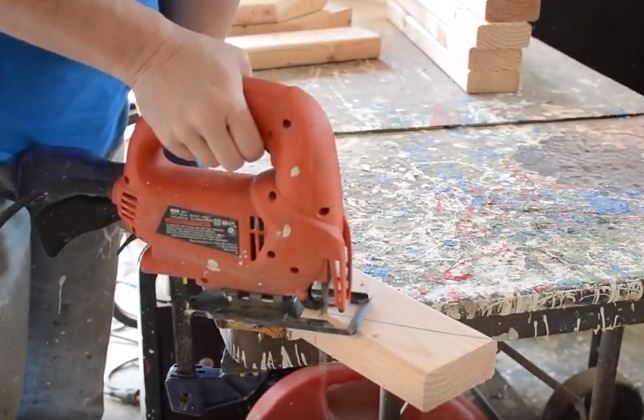
The 20″ pieces will form the “A” and this is where you will need the jigsaw. You are going to cut off one end of a 2 x 4 and it will end up being a triangle piece. I thought it was a 45 degree line that I cut, but looking at it now, I know it is not cut at 45 degrees. Honestly I don’t know what the angle is. (sorry!) But I positioned 2 pieces of 2 x 4 to form an A, and when I got to the angle where the 2 centers would meet up flush, this is how I got the angle. I know that is not technical, or precise, but that is how I did it to get the angle I needed it to be. I guess I should have paid more attention to geometry in high school.
Once you have one angle cut, then use that first 2 x 4 piece as your template, and draw on the other 7 20″ pieces of lumber a line of where you will be cutting. It should look like this…

Now it is time to assemble the A’s, or the bases of the coop. set the cut 2 x 4’s to form an A, having the two angled cuts joining together. Then take one of the 5″ pieces of 2 x 4 (it should look like a little block of wood) and pre-drill some holes into the the block of wood. By drilling the starter holes, this will prevent the wood from splitting. Then attach the block of wood to the A section of your 2 x 4.

Now take a piece of the 22 1/2″ piece of 2 x 4 you cut, and attach this to the bottom of your A shape. This will form the bottom of your coop. Again pre-drill the holes before securing the bottom piece. Once you have attached one piece to the bottom, flip it over and repeat the process of securing a piece of 22 1/2″ wood to the other side. When you are done, the “A” will stand up on it’s own.
You will repeat this process 4 times, because you need 4 of these pieces to form the frame of your coop.
Attaching The Long Boards
Once you have your bases completed, now you will take the 60″ long 1 x 4″ boards and attach them to the bases. For this I did use an air gun nailer, to tack the 1 x 4 boards to the bases. The nail gun helped to keep the boards in place until I could attach the boards to the bases with 2 1/2″ long screws.

Just attach the boards how you want them to be. You can make it a solid coop, or like I did and have some spacing between the slats of wood. And when I had the boards tacked on, I went back with my drill and pre-drilled holes for securing the boards with screws to the bases.
This is the longest process of this project. Attaching 16 pieces of wood is tedious, but if you do it correctly, and take your time, your coop will last longer.

And that is pretty much it! The coop is complete, and ready to be stained, or painted, or whatever you like. If you are planning on staining, or painting, you might want to do that step first, before you assemble the coop. It will be a lot easier to paint it before it’s assembled.
How To Build A Horse Jump Coop Video
If you want to watch a video of how I built this coop, you can watch my process here.
And if you are looking for different videos on building horse jumps for yourself, check out my YouTube channel, The Budget Equestrian. If you do, I promise you will have a ton of ideas so that you can complete your own horse jumps, and save a lot of money in the process!
3 replies to "Building A Coop For A Horse Jump"
Hi there! How tall did this coop end up being? Planning to build this weekend, but may need to modify. thanks!
Hi Ashley 🙂 I built this a long long time ago, and I believe it ended up being around 20″ tall (?) that was what the lady who I had built it for wanted to to be. Relatively small, but very useful for fill 🙂
[…] Credit: Budgetequestrian Check Instruction […]